Making Non-Destructive Image Adjustments in Adobe Photoshop
Image adjustments are pretty much the cornerstone of any image editing software, and apart from learning how to use each specific adjustment tool, knowing how to best integrate these tools into your workflow can make all the difference when you are trying to achieve a particular effect and extract the most out of the images you edit or create.
In this tutorial, I am going to share with you two ways you can apply image adjustments non-destructively, outline the specific benefits of each workflow and share additional tips and tricks which will enable you to work smarter and more efficiently, have more control over the adjustments you are making and unlock their full potential, and also have more room for visual experimentation!
Why Work Non-Destructively?
In Adobe Photoshop you can add most adjustments in a number of different ways, both destructively and non-destructively. I always advocate for working smart and seizing all of the benefits of applying adjustments and filters non-destructively.
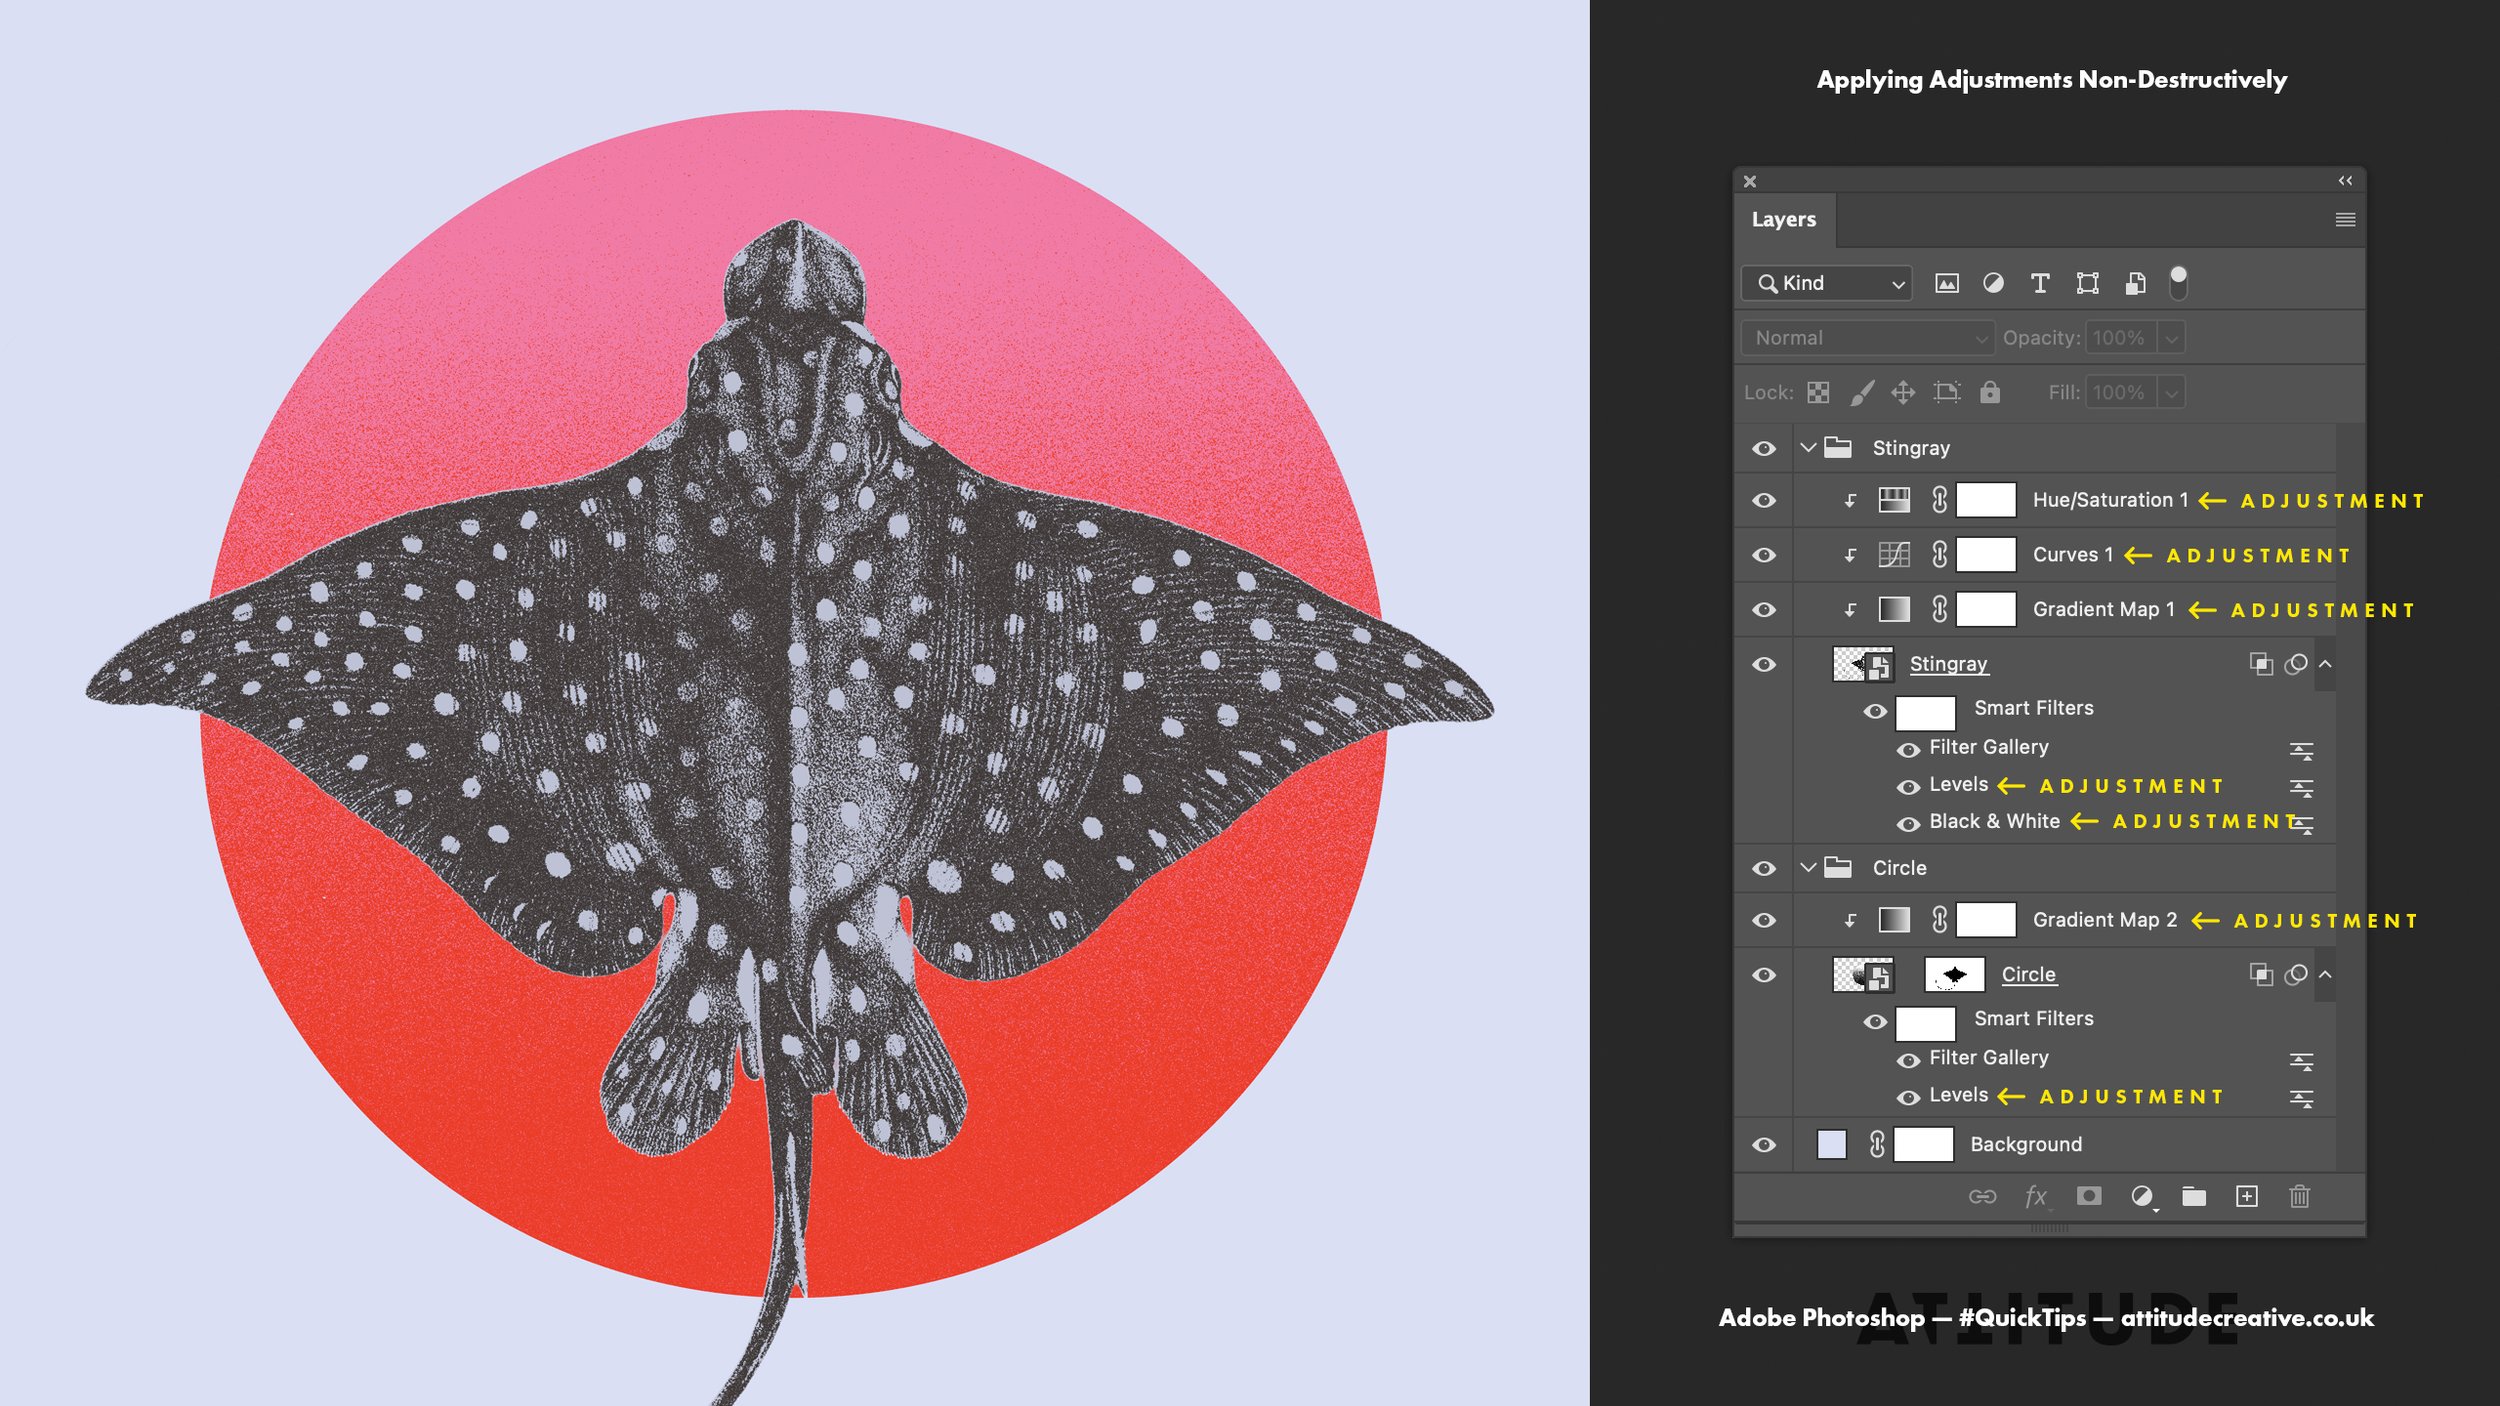
To be able to make adjustments non-destructively, you will need to apply them either as Adjustment Layers, or as Smart Filters — these are two workflows which have their own unique advantages, which you can choose from or combine on the case to case basis.
Applying adjustments non-destructively makes it possible to:
modify or undo the changes you make to your image at any time which provides more flexibility and room for experimentation;
mix adjustments with each other and experiment with the order in which they are applied to your image to achieve different effects;
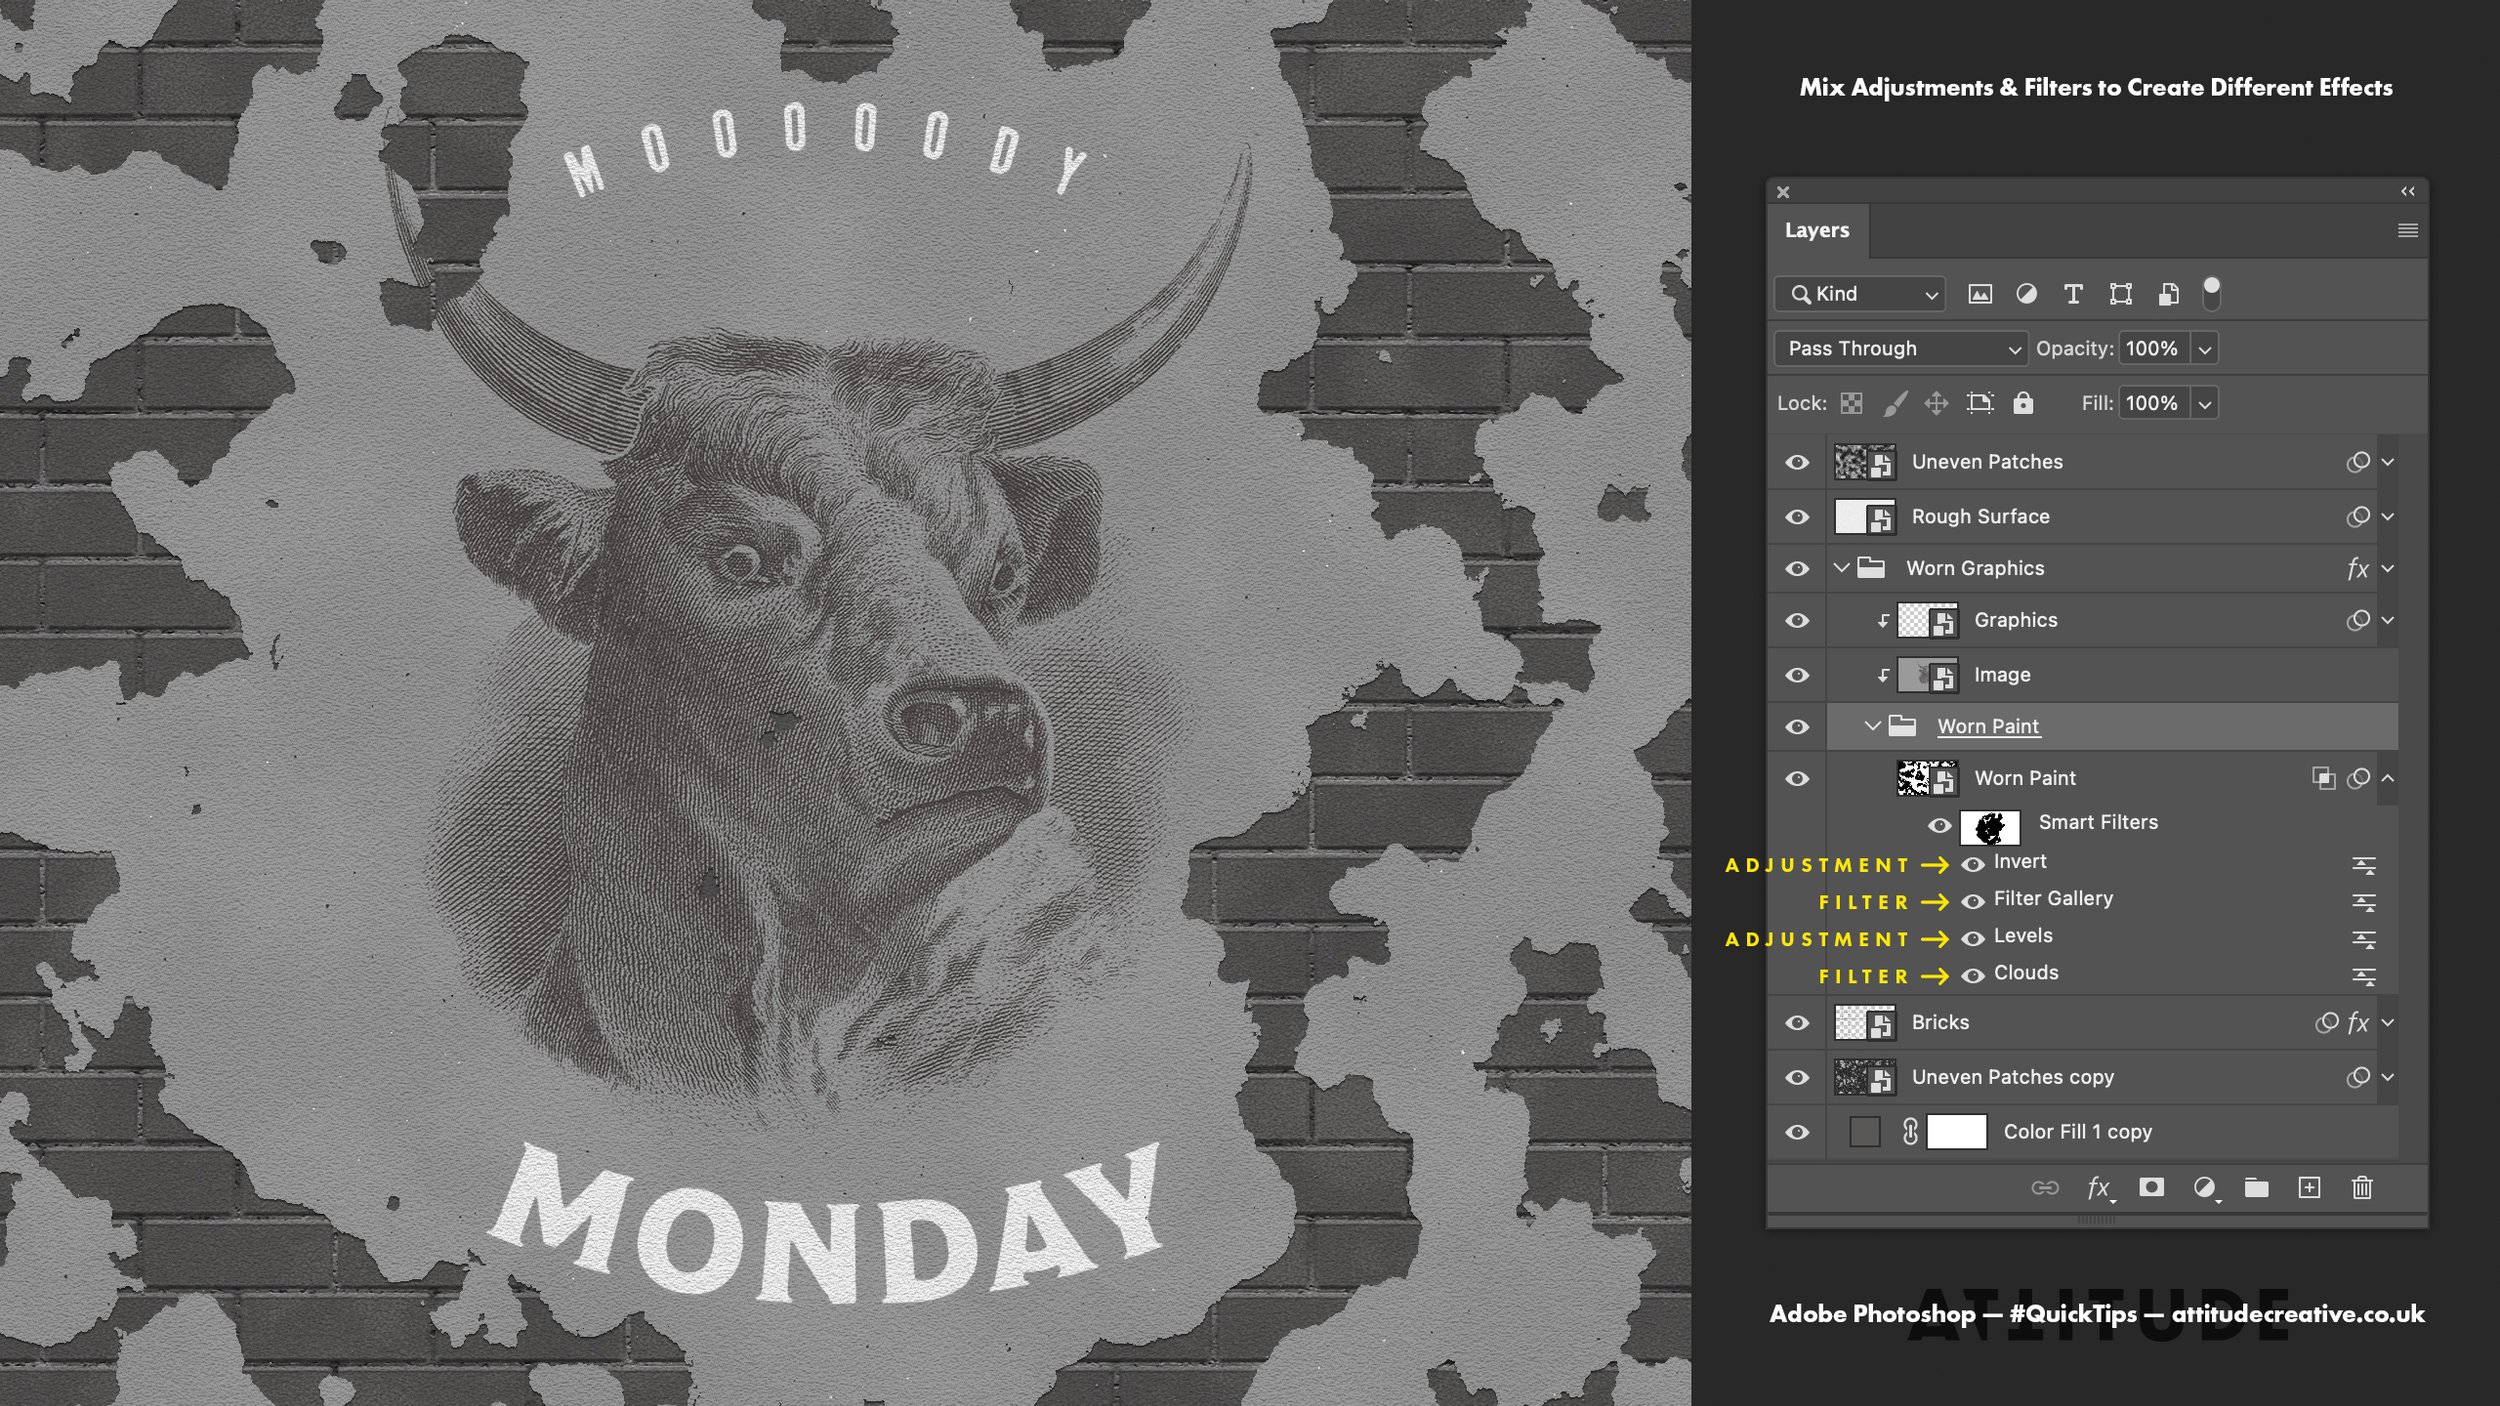
mix adjustment with filters (in case when adjustments are applied as Smart Filters);
change the adjustments’ effects using different Blending Modes, as well as Opacity and Fill values;
when and if required make changes to multiple layers at the same time (in case when using Adjustment Layers).
Currently in Adobe Photoshop there are 17 adjustments which can be applied non-destructively, including:
tonal adjustments: Brightness/Contrast, Levels, Curves, Exposure & Shadows/Highlights (currently not available as an Adjustment Layer);
color adjustments: Hue/Saturation, Color Balance, Black & White, Vibrance, Photo Filter, Channel Mixer, Color Lookup & Selective Color (which in Photoshop’s interface is grouped with the adjustments group below, although it deals with the colours);
adjustments for creating graphic effects: Invert, Threshold, Posterize & Gradient Map.
In this tutorial, we are not going to look into any specific adjustments (but you can learn more about Curves and Gradient Maps in separate blog posts), and concentrate on the two workflows instead.
Creating Adjustment Layers
You can add a new adjustment layer two ways:
either click on the Add New Fill or Adjustment Layer button in the bottom of the Layers panels and select the desired adjustment from the list;
or go to the Adjustments panel and click on the button for the desired adjustment there.
When you add any new adjustment layer, the Properties panel should open automatically, and if not, just double-click on the adjustment layer’s thumbnail to open it up (and do the same at anytime throughout the process when you need to access and edit any adjustment layer’s properties).

You can use adjustment layers when working with all kinds of layers, including raster image layers, Smart Objects and Fill Layers, and use them to make adjustments to multiple layers or groups of layers which you want to be affected by the same adjustments.
By default, adjustment layers affect all of the layers placed below them in the Layers panel, so make sure your adjustment layer is above the layer (or multiple layers, or a group) you want it to affect. If you have multiple layers in your document and want your adjustment layer to affect just one layer or a group, you can clip the adjustment layer to that specific target layer or group, which will stop the adjustments from affecting any other layers below. To clip your adjustment layer to a layer or a group, either Alt/Option+click between the adjustment layer and the layer/group below, or right-click on the adjustment layer in the Layers panel and from the menu select Create Clipping Mask.
Using Multiple Adjustment Layers
When you use multiple adjustment layers, their effects are applied on top of each other, and the order of the adjustment layers affects the final look, so re-arrange the adjustment layers to create the desired effect.
Tip: apply tonal adjustments first, and then apply any colour adjustments or a Gradient Map adjustment, but if you are using a Black & White adjustment, apply it before any tonal adjustments.
If you want to clip multiple adjustments to the same layer or group, make sure all of them are clipped and show an arrow icon next to them — if you have a general, not clipped, adjustment layer in the mix, any adjustment layers above it won’t be clipped to the layer/group below this set of adjustment layers and will affect all of the layers below.

Modifying the Adjustments’ Effect
Just like any other layer in Adobe Photoshop, Adjustment Layers can be set to different Blending Modes to change the way they affect the layers below, and you can change the intensity of their effect using the Opacity setting.
If you are using Color Burn, Linear Burn, Color Dodge, Linear Dodge, Vivid Light, Linear Light, Hard Mix or Difference Blending Modes, you can also use the Fill setting to change the look of the adjustment in a different way to Opacity; with all other Blending Modes changing Opacity and Fill will give your the same result of changing the transparency.
Adding Adjustments as Smart Filters
If you are working with Smart Objects, you can apply adjustments as Smart Filters. This can be useful either when adjustments are required to be used in the mix with other kinds of smart filters, or if you simply prefer working this way with the individual adjustments and like keeping the number of layers down.

To add an adjustment as a Smart Filter, select the Smart Object you want to apply it to and go the the Image menu > Adjustments, and select the desired adjustment from the list. You can apply most of the adjustments as smart filters, apart from the ones which are greyed out and the HDR Toning adjustment which will prompt you to flatten the image.
Apart from selecting adjustments from the menu, you can also use the shortcuts which exist for the most popular adjustments, and it is worth memorising them:
Curves: Command+M on Mac or Control+M in Windows;
Levels: Command+L on Mac or Control+L in Windows;
Hue/Saturation: Command+U on Mac or Control+U in Windows;
Colour Balance: Command+B on Mac or Control+B in Windows;
Black & White: Command+Option+Shift+B on Mac or Control+Alt+Shift+B in Windows;
Invert: Command+I on Mac or Control+I in Windows.
As soon as you select the new adjustment from the menu or press the respective hot keys, an adjustment dialog will pop up and you’ll see that particular adjustment added to your Smart Object in the Layers panel. Since you are working non-destructively, you don’t need to make your final changes straight away, so after making some initial adjustments (or even after simply opening the adjustment’s dialog) press OK to add your selected adjustment to your Smart Object. And then edit the adjustment’s settings whenever necessary by double-clicking on the filter’s name underneath the Smart Object layer in the Layers panel.
If you have multiple Smart Filters (adjustments or filters from the Filter menu) applied to your Smart Object, their order will affect the final look (just as the order of the adjustment layers does), and you can re-arrange the Smart Filters’ order at anytime to suit your purpose.
Blending Options of Smart Filters
When adjustments are applied as Smart Filters, you can change their Blending Mode and Opacity via the Blending Options dialog which can be accessed for each of the Smart Filters by double-clicking on the icon to the right of the filter’s name. This will create exactly the same effect as changing the Blending Mode and Opacity of the Adjustment Layer I’ve mentioned earlier, but unlike when working with the Adjustment Layers, if you are using Color Burn, Linear Burn, Color Dodge, Linear Dodge, Vivid Light, Linear Light, Hard Mix or Difference Blending Modes, changing the Opacity in this case will create the same effect as changing the Fill value of the adjustment layers.

Properties Panel vs Adjustment Dialog
When applying adjustments as Adjustment Layers and Smart Filters, you will have access to all of the same options and settings, although for some adjustments the interface of the Properties panel for an adjustment layer and Adjustment options dialog for a Smart Filter can look slightly differently:
when working with Adjustments Layers, additional options and settings can be found via the menu in the top right corner of the Properties panel for the selected adjustment;
when working with Smart Filters and Adjustment dialogs, additional options can be accessed via the Options button in the dialog or found up-front in the dialogs as checkboxes or buttons.
In conclusion, when choosing between the two ways of using non-destructive adjustments, firstly think about the effect you want to create and whether you need to be able to mix adjustments with the filters, as this is the biggest difference between the two workflows — and remember that you can also mix the two approaches together to have even more flexibility!
So, that’s it for this quick guide, and I hope that if you’ve been into making destructive image adjustments in the past, you are now convinced to start using Adjustment Layers and Smart Filters — and reap all the benefits of the non-destructive workflow, and have more fun and flexibility when creating graphics!