Grainy Geometric Glitch Effect in Adobe Photoshop


Up for creating some abstract grainy & glitchy artwork? In this tutorial, I’ll walk you through this super simple experimental technique for turning any high-contrast compositions into exciting, noisy and pixelated artworks, with a bit of a retro geometric aesthetic and a hint of a pixel sorting effect. These will be perfect as abstract backgrounds or as elements for any graphic design projects or posters which call for a messy, but structured experimental vibe! And all you need is a super basic colourful composition, a few Adobe Photoshop filters and a desire to experiment!
Follow the steps in this tutorial to learn how to create this effect from scratch, and don’t hesitate to check out our Grainy Glitch Abstract Art Generator kit to get your hands on a selection of 30 actions which will allow you to apply all of the required filters in just a few clicks, explore a range of different effects and easily start creating your own artworks using the included PSD documents containing fully editable graphic compositions!
Instructions
Step 1: Document Setup
To get the best results when creating this effect, you will need to nail your document setup.
Start by creating a new document in Adobe Photoshop and set it to RGB colour mode, 8 bit colour, 300 dpi resolution and square pixels.
Then specify your desired canvas size: concentrate more on the aspect ratio rather than the actual size, and set the shorter side to between 1000 and 2000 px (my image size is 1080x1350 px). The smaller the size of your canvas, the more obvious your pixels and noise will appear. Don’t overthink it at this stage, as we’ll be working non-destructively and using Smart Filters, so you will be able to change the image size and explore how it changes the look of your artwork later on! And if you need to create a large final image, you’ll be able to scale your artwork up afterwards without losing any quality and whilst maintaining the noisy oversized pixelated look and all the details.
Create a new document and save it in a PSD format.
Step 2: Creating the Colourful Composition to Distort
You can technically apply this effect to any colourful and high-contrast artwork and it’ll work pretty well — and can become quite addictive, too! But if you want to start from scratch, simply draw a few different shapes in different contrasting colours which work well together:
It’s best to create shapes with hard edge, so you can use a Hard Round Brush or create circles or rectangles, or any other shapes and arrange them on the canvas. In my example, I am using long rectangles from my 2024 palette presentation graphic which was created in Adobe Illustrator and pasted into Photoshop as a Vector Smart Object.
Make sure you don’t have any transparent or semi-opaque areas in your Smart Object layer, otherwise some of the effects will work and look slightly differently. So to be on the safe side, consider adding a separate colour fill layer and fill it with a desired colour to act as an overall background.
When you are done creating your colourful shapes — less is more, so don’t overdo it, and consider having some blank areas around if you want to have a less busy final composition — select all the layers you’ve been drawing on and your background colour layer in the Layers panel, right-click on the selection and select Convert to Smart Object from the menu to convert all your layers into a single Smart Object.
If you don’t want to create a colourful composition from scratch, paste any existing colourful artwork into your document and convert it into a Smart Object filling the entire canvas.
Step 3: Creating the Initial Distortions
With the colourful base composition ready, now it’s time for the fun part — and you’d be surprised how easy it is to create this effect!
Start by selecting your Smart Object layer and go to the Filter menu > Distort and select Wave.
In the Wave Filter’s setup dialog, set its Type to Square and Undefined Areas to Wrap Around to get elements from one side appear on the opposite edge. And then simply play around with the rest of the settings until you like the look. I like using 1 Generator, and other than that just adjust the settings and see what is happening in the effect’s preview window. Play around, or use the same settings I’ve got in the screenshot below.
When ready, apply changes, and you can always adjust your Wave effect at any time by double-clicking on the Wave filter’s name below the Smart Object in the Layers panel — oh, the beauty of the non-destructive workflow and using Smart Filters!;)
Even after applying this effect, you might get some pretty cool looking artwork which you can use as it is. But we are surely going to push it further!
Step 4: Messing With the Colours (optional)
To spread the colours a little more and make the work look more dynamic you can add a Motion Blur effect on top of the Wave effect. This effect will allow you to add a bit more variation and more options for customising the look of your final artwork, but this step is not essential.
Still with your Smart Object selected, go to the Filter menu > Blur and select Motion Blur.
Choose the Direction you want your shapes to spread in: set it to 0 degrees for the horizontal blur (my choice in this case), 90 or –90 degrees for vertical, or to any other angle to mix the colours in any other direction. I’d recommend blurring horizontally or vertically to have a cleaner structured look afterwards.
Set the Distance to any value you like, but keep in mind that the higher the value the more blended your colours will get. Somewhere around 50–100 mark usually works pretty well to begin with, and you can always adjust these settings afterwards after applying all of the other effects.
When ready, apply changes.
Step 5: How About Some Oversized Pixels?
Now it’s time to take whatever you have at this point and give it a nice oversized pixelated look.
Go to the Filter menu > Pixelate and add a Mosaic filter.
In the Mosaic filter’s setup dialog, set the Cell Size to 32, or feel free to experiment if you want.
Apply changes.
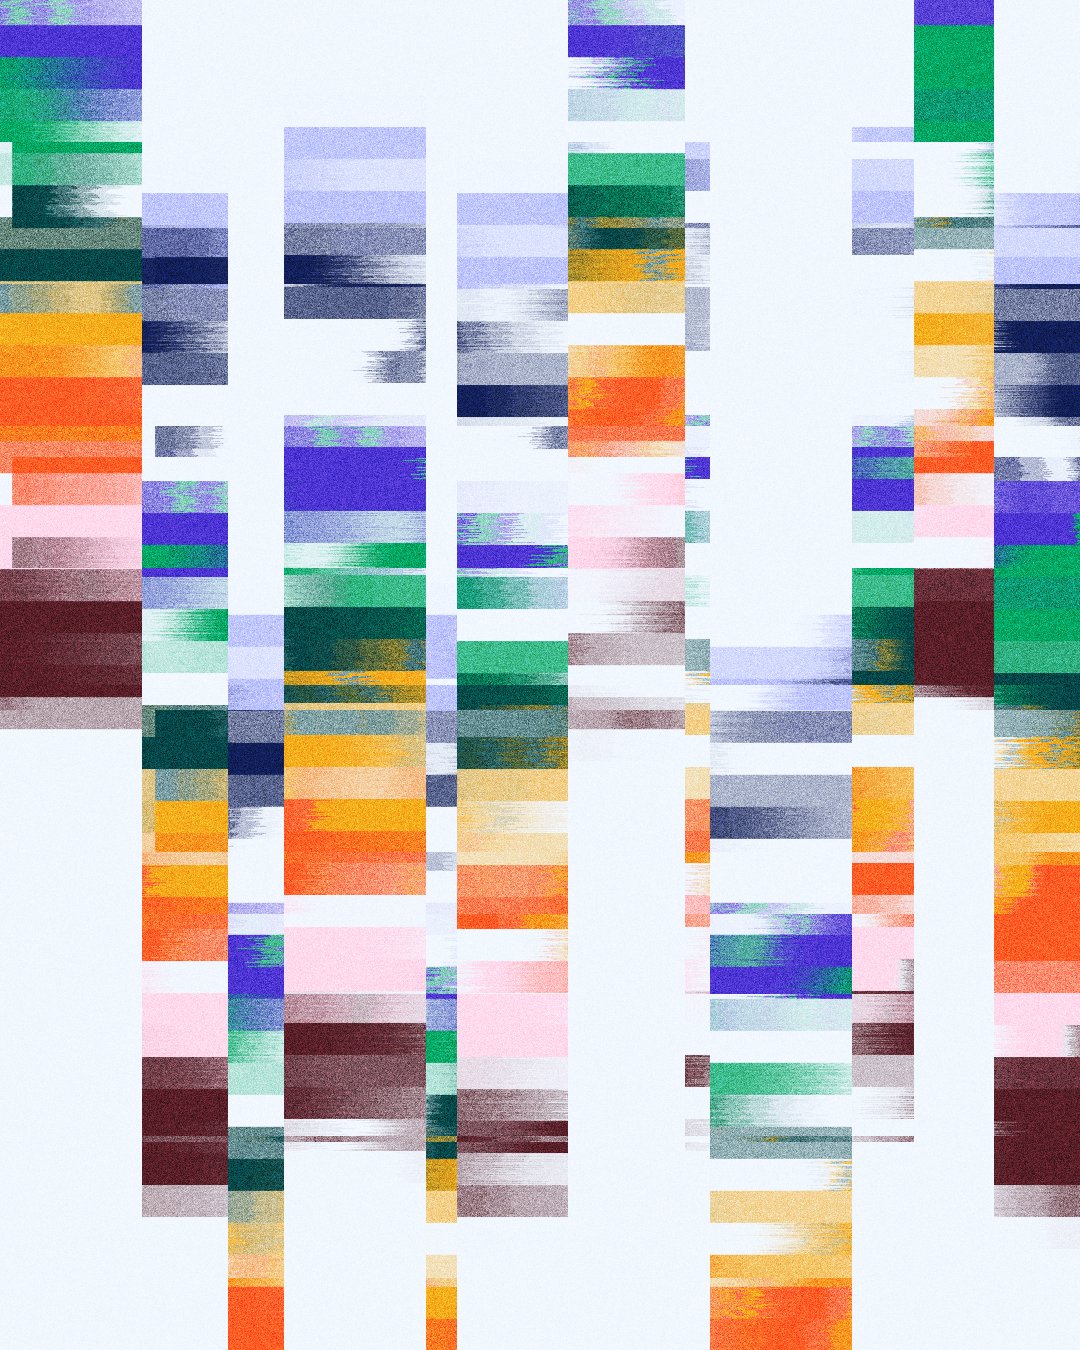
Depending on your original colour composition this could actually look pretty decent too, so if you love the oversized pixels look, keep the effect combo we’ve applied so far in mind for any future experiments — but we’ll keep on going!
Step 6: Making Pixels Go Whoosh!
Next, let’s add a bit more movement to the pixels (in a “pixel sorting” kind of way) to make the artwork look more dynamic and digital.
Head to the Filter menu > Stylise and select Wind.
In the Wind filter’s setup dialog, set Method to Stagger, and choose the desired direction of movement.
Apply changes.
If you want the effect to be stronger, simply apply another Wind effect, and another, and another… until you like the look (and that’s a kind of pixel sorting right there). If you are using more than one Wind filter, you can also apply different directions to them, to make the pixels go both ways. I’ll stick with the couple of the Wind filters in my example: one coming from the left and another from the right.
Note: It’s wind, right? So it only goes horizontally left to right or right to left. If you want this effect to go vertically, well, you guessed it, you’ll have to rotate your canvas first. Then apply the Wind filter and all of the following effects, and when you’re totally done with everything, either flatten the image or rasterise your Smart Object with all of the applied effects and rotate it then, or even better, export your image as it is on its side in JPG or any other format and then rotate that image afterwards (whilst keeping the original PSD with the Smart Filters and the wrong orientation).
Step 7: Bringing Back the Gridded Geometric Structure
Again, this is a pretty cool look right there! But after adding the Wind effect, the artwork won’t have any vertical lines in it and will lose the gridded geometric look. So let’s fix this by adding another Wave effect on top of the Wind effect(s).
Select your Smart Object and go to the Filter menu > Distort and select Wave.
Here, yet again, set type to Square to create sharp vertical and horizontal lines (or play around with the other two options to create two completely different looks).
Check both Wrap Around and Repeat Edge Pixels options and choose the one which allows you to create the desired look.
In this case, apart from experimenting with the Wavelength, Amplitude and Scale, you might also want to play around with the Number of Generators. And since the artwork is almost done, you’ll pretty much see the final result in the preview window — so tweak the settings until you like what you are seeing!
If you are after a more funky distorted look, but also like the vertical and horizontal grid look, add two Wave effects instead of just one: first with any other distortion creating a different Type of waves and the second one on top set to the Square Type.
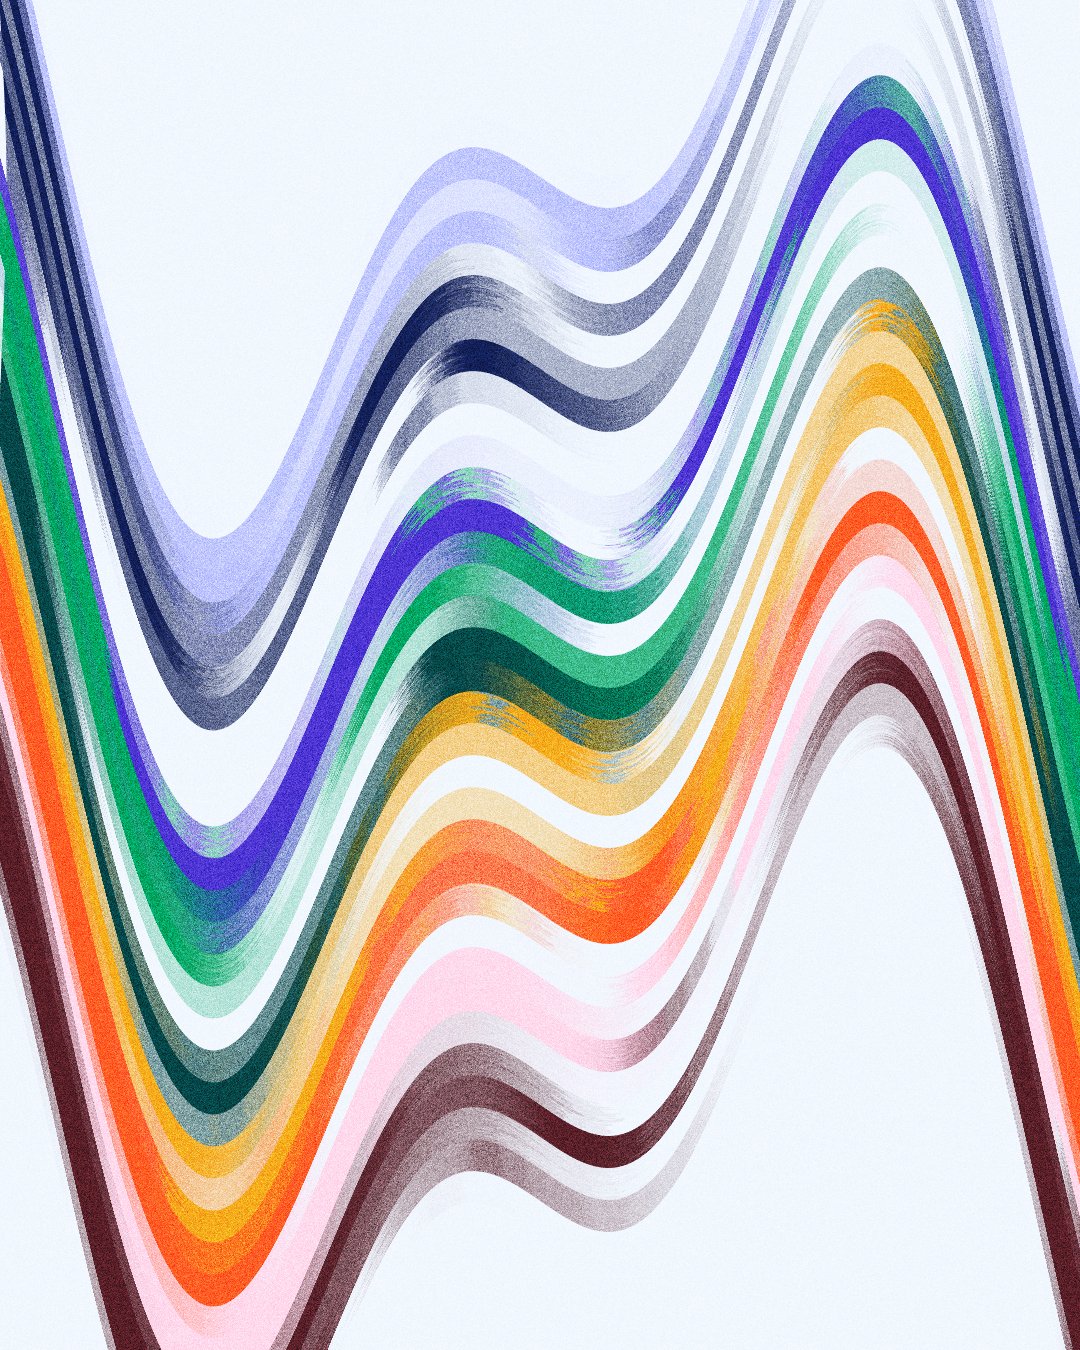
Sine Wave effect on top of the Wind Filter.
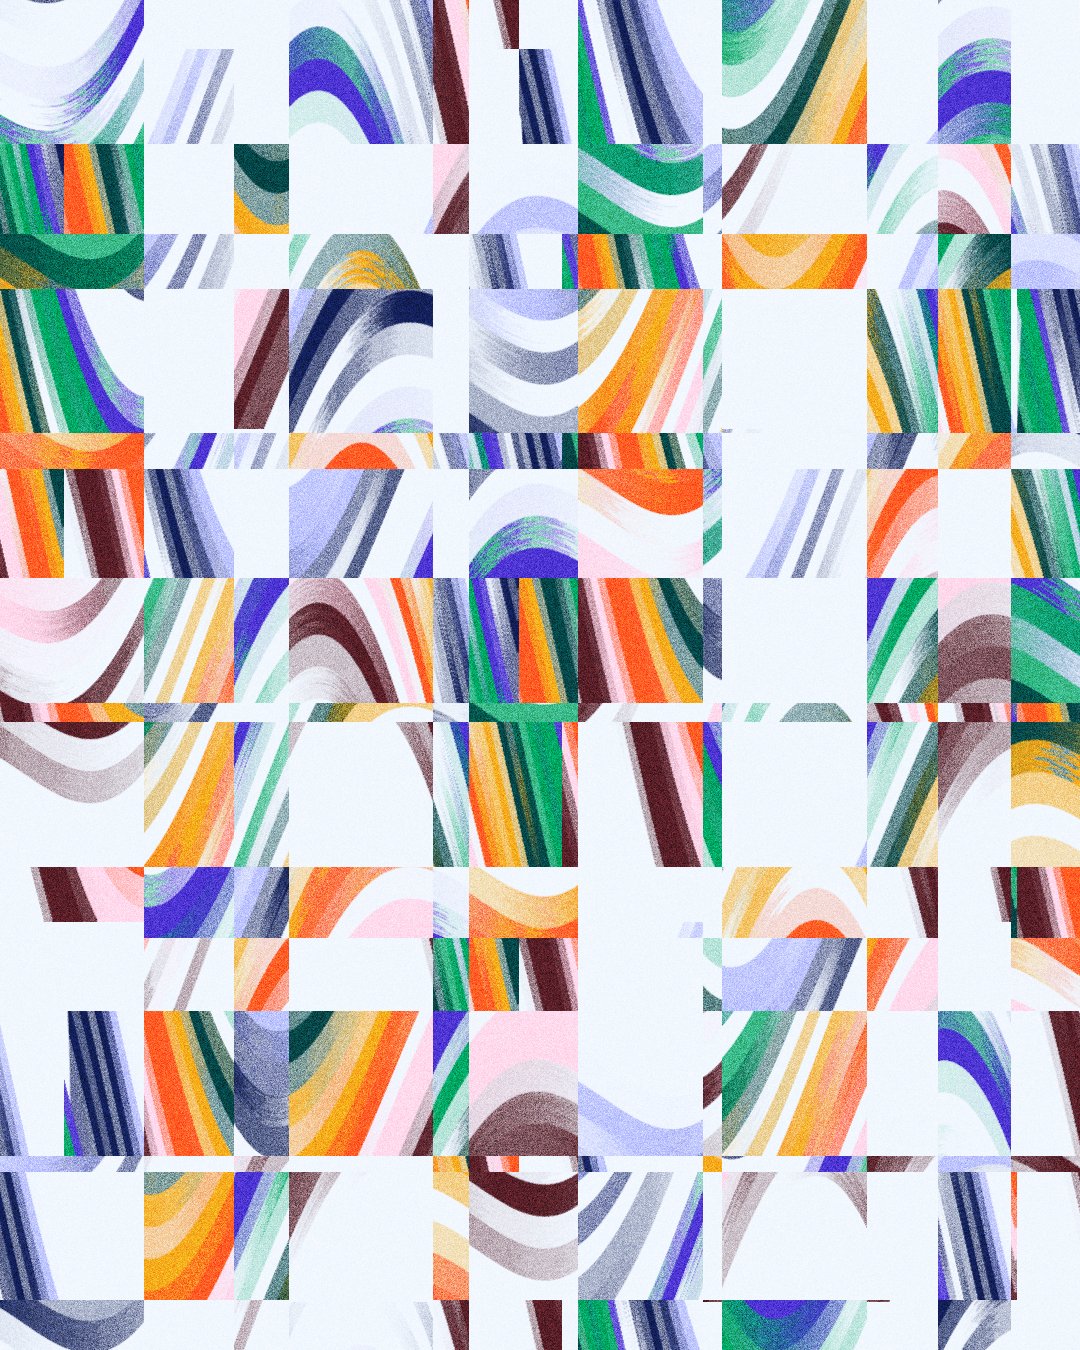
Square Wave effect on top of the Sine Wave effect.
Step 8: Making your Artwork Grainy
Now with the colourful shapes and distortion ready, it’s time for the final touches and making the artwork look noisy!
Method 1:
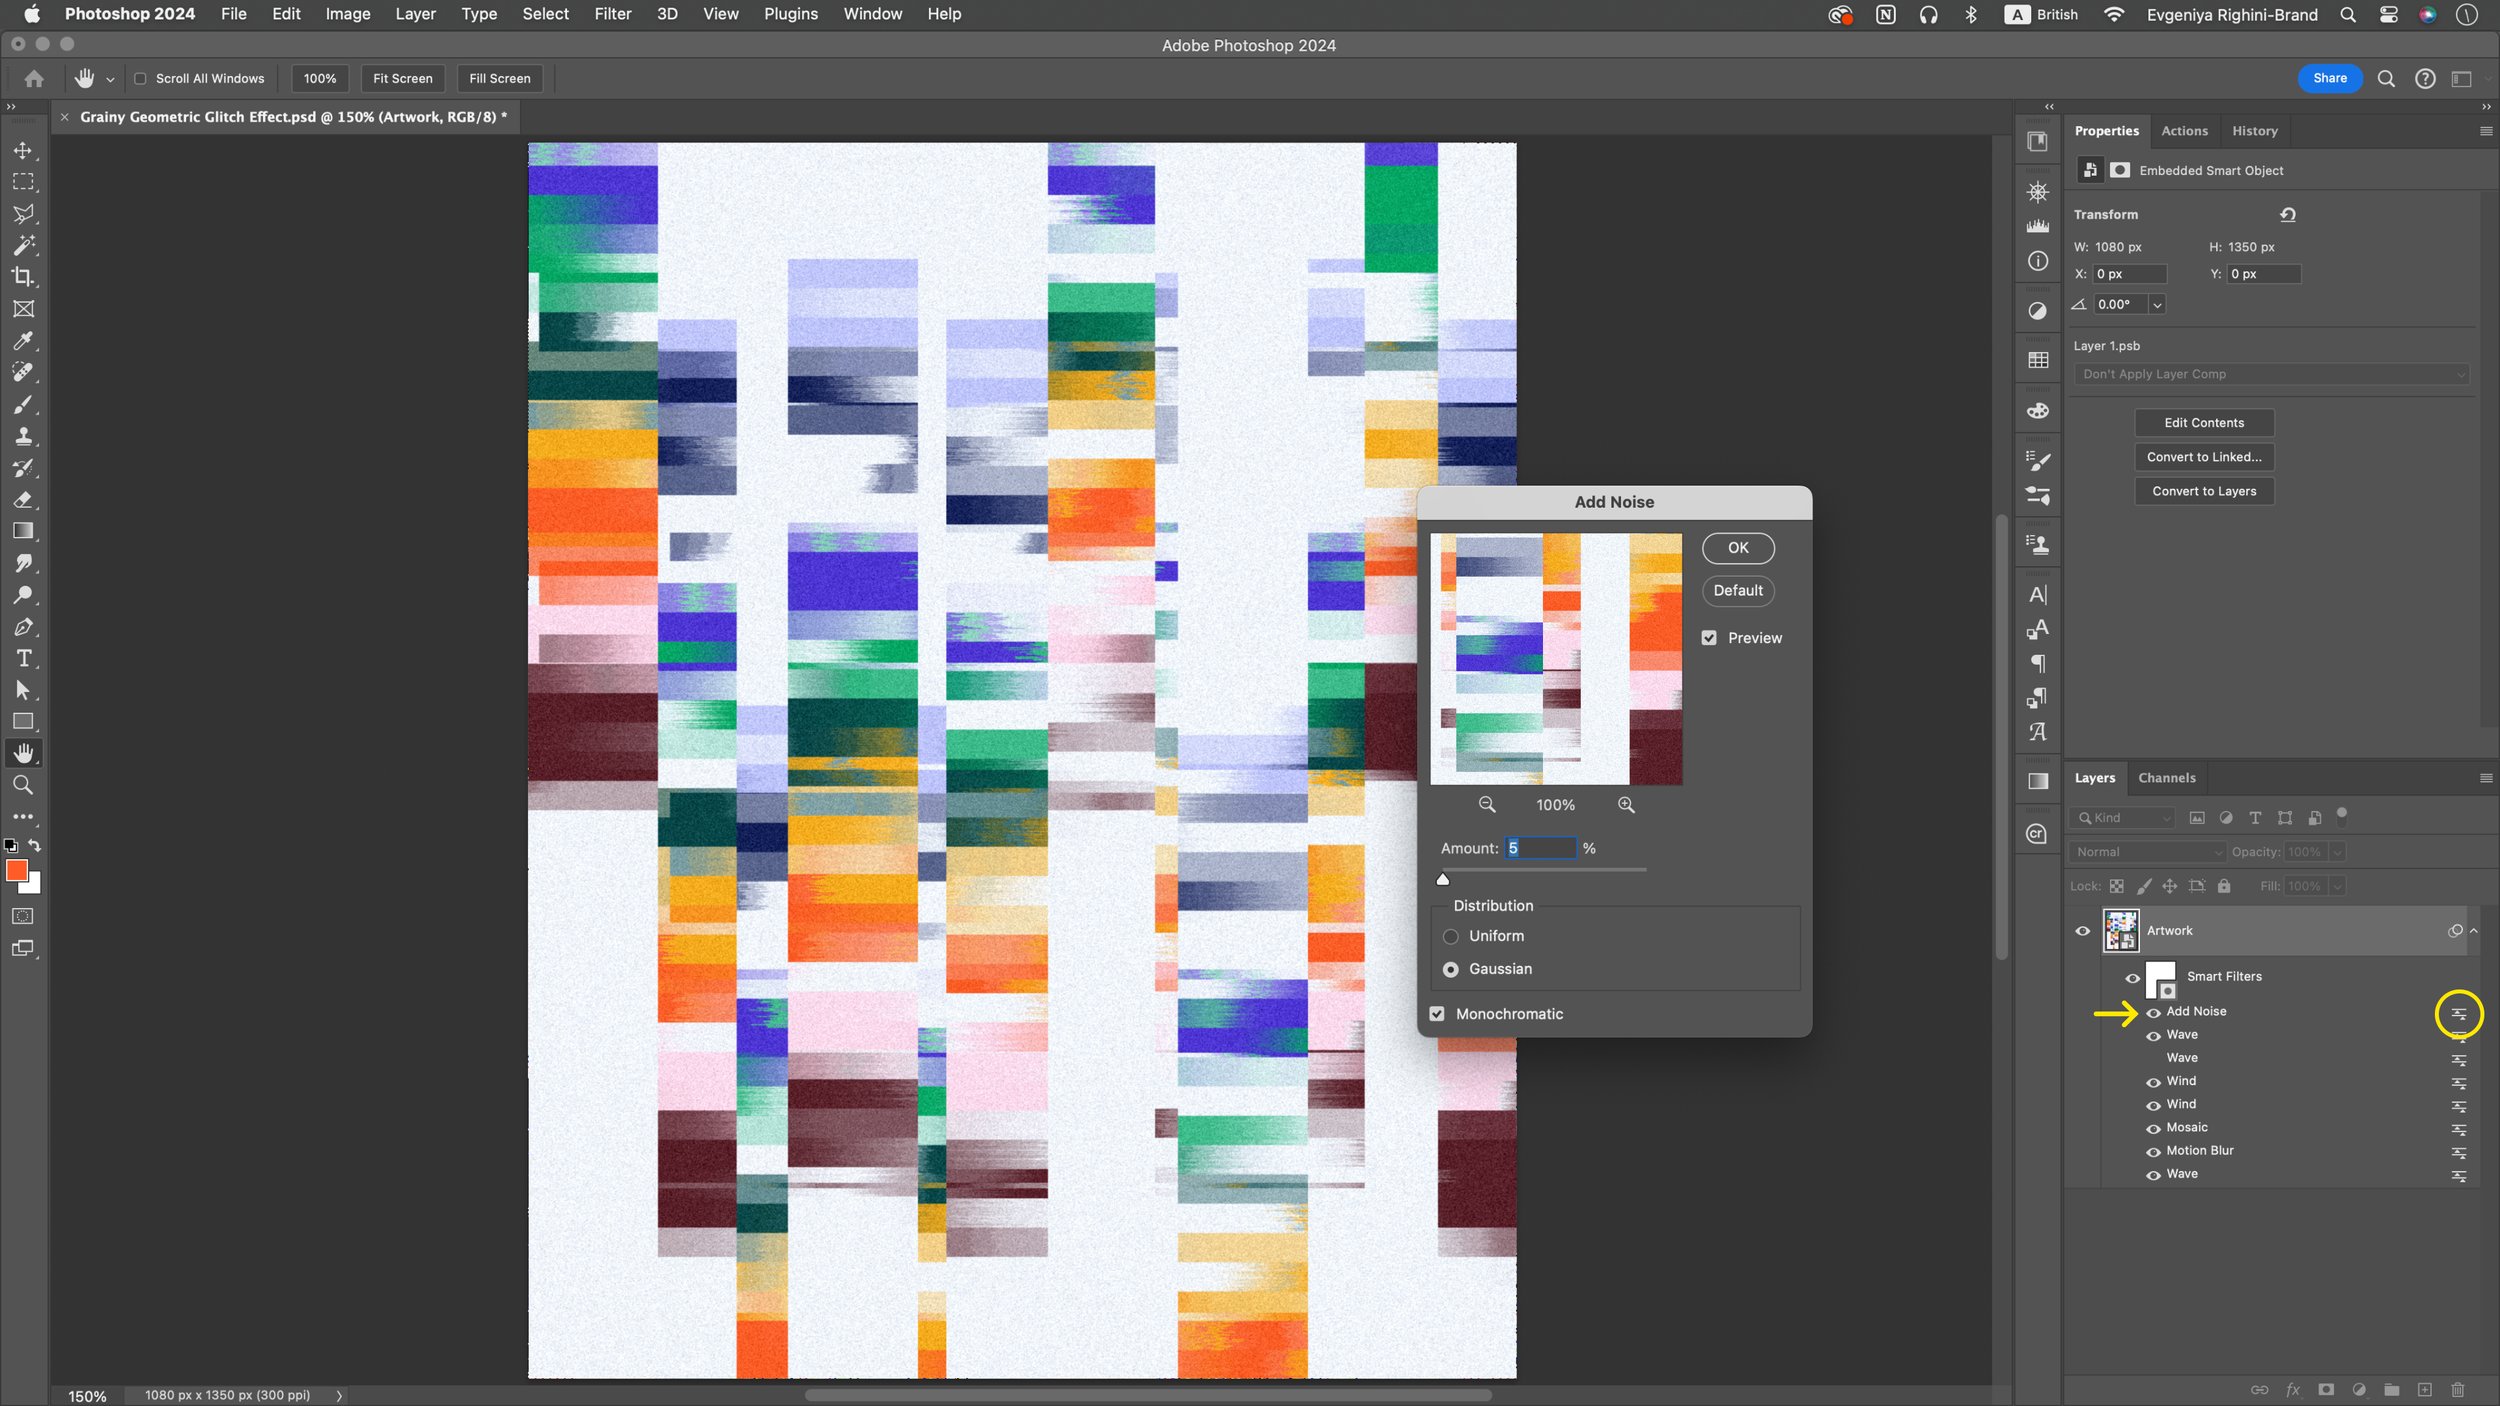
Again select your Smart Object with the Artwork and go to the Filter menu > Noise and select the Add Noise filter.
Set the amount to about 5–25%, this will depend on the colours in your artwork, the size of your canvas and how noisy you want it to look, so try different settings.
Check the Monochromatic box and choose between the Uniform and Gaussian based on the look you like. Gaussian looks better at a lower amount values (around 5-15%), and Uniform looks better at about 10–25%, but again it’ll depend on the colours in your work.
When ready, apply the filter. If necessary, revisit the filter’s settings afterwards to further adjust the look by double-clicking on the Add Noise filter’s name under your Smart Object in the Layers panel.
If you want to have a more subtle look for the noise, apart from changing the amount value and the type of noise, you can also adjust the Blending Option of the Add Noise filter: simply double-click on the sliders icon to the right of the filter’s name in the Layer’s panel and in the Blending Options dialog which will pop up select a different Blending Mode or change the Opacity value.
Method 2:
Alternatively, you can apply the Add Noise filter to a separate neutral grey layer and play around with blending it with the artwork layer below. This technique works better if you have very light areas in your artwork and don’t want them to be affected too much by the noise.
To add noise to a separate layer, do the following:
Press Command+Shift+N on Mac or Control+Shift+N in Windows to open the New Layer setup dialog. Under Mode, select Overlay, check the tick box which says “Fill with Overlay-neutral color (50% gray)” and create your new layer.
Make sure your new layer is above your artwork layer, rename it to “Noise” to keep things tidy, and then convert it into a Smart Object.
Select your new “Noise” Smart Object layer and go to the Filter menu > Noise > Add Noise.
In this case, set the Amount to around 10%, select Gaussian, check Monochromatic, and apply changes.
To change the strength of the noise, play around with the Opacity of this layer to get the look to your liking or try using the Soft Light Blending Mode as an alternative to Overlay to change how the noise affects different tonal areas in your image. And if you want it to be even more noisy, you can always duplicate your “Noise” layer!
Step 9: Playing Around & Fine-tuning the Look
And here’s your effect all set up! You can now play around with fine-tuning the look by adjusting the settings of the applied filters.
You can also create a ton of new variants by changing the contents of the Smart Object with the colourful shapes and changing the settings of the Smart Filters: you can consider changing all of the settings, but the most pronounced changes come from changing the Wave and the Mosaic effects.
Note: If you notice thin lines in your artwork which don’t look quite right, either play around with the topmost Wave effect and use the Repeat Edge Pixels setting instead of the Wrap Around, or avoid using Wind effects set to two different directions, or just ignore these lines or retouch them and fill in the gaps afterwards.

Step 10: Scaling Your Artwork
At this point (whilst having the Smart Filters applied to your Smart Object with the colourful shapes) your can also change the image size: this will affect the relative scale appearance of your pixels and noise: in smaller images the pixels will look more pronounced, and in bigger images the pixels and noise will look more subtle.


Alternatively, if you like the scale of your pixels vs the elements in your artwork, but you’ve been working on a canvas smaller than your desired final output size, you can easily scale your actual pixelated artwork up to the desired size without losing any quality.
First of all, when you are done with the setup of all of the effects, save your PSD document with the Smart Object and Smart Filters so you can easily revisit it in future or use as a basis for creating other similar artworks.
Then save a copy in any flattened image format (JPG, PNG or TIFF will work just fine) in the maximum quality.
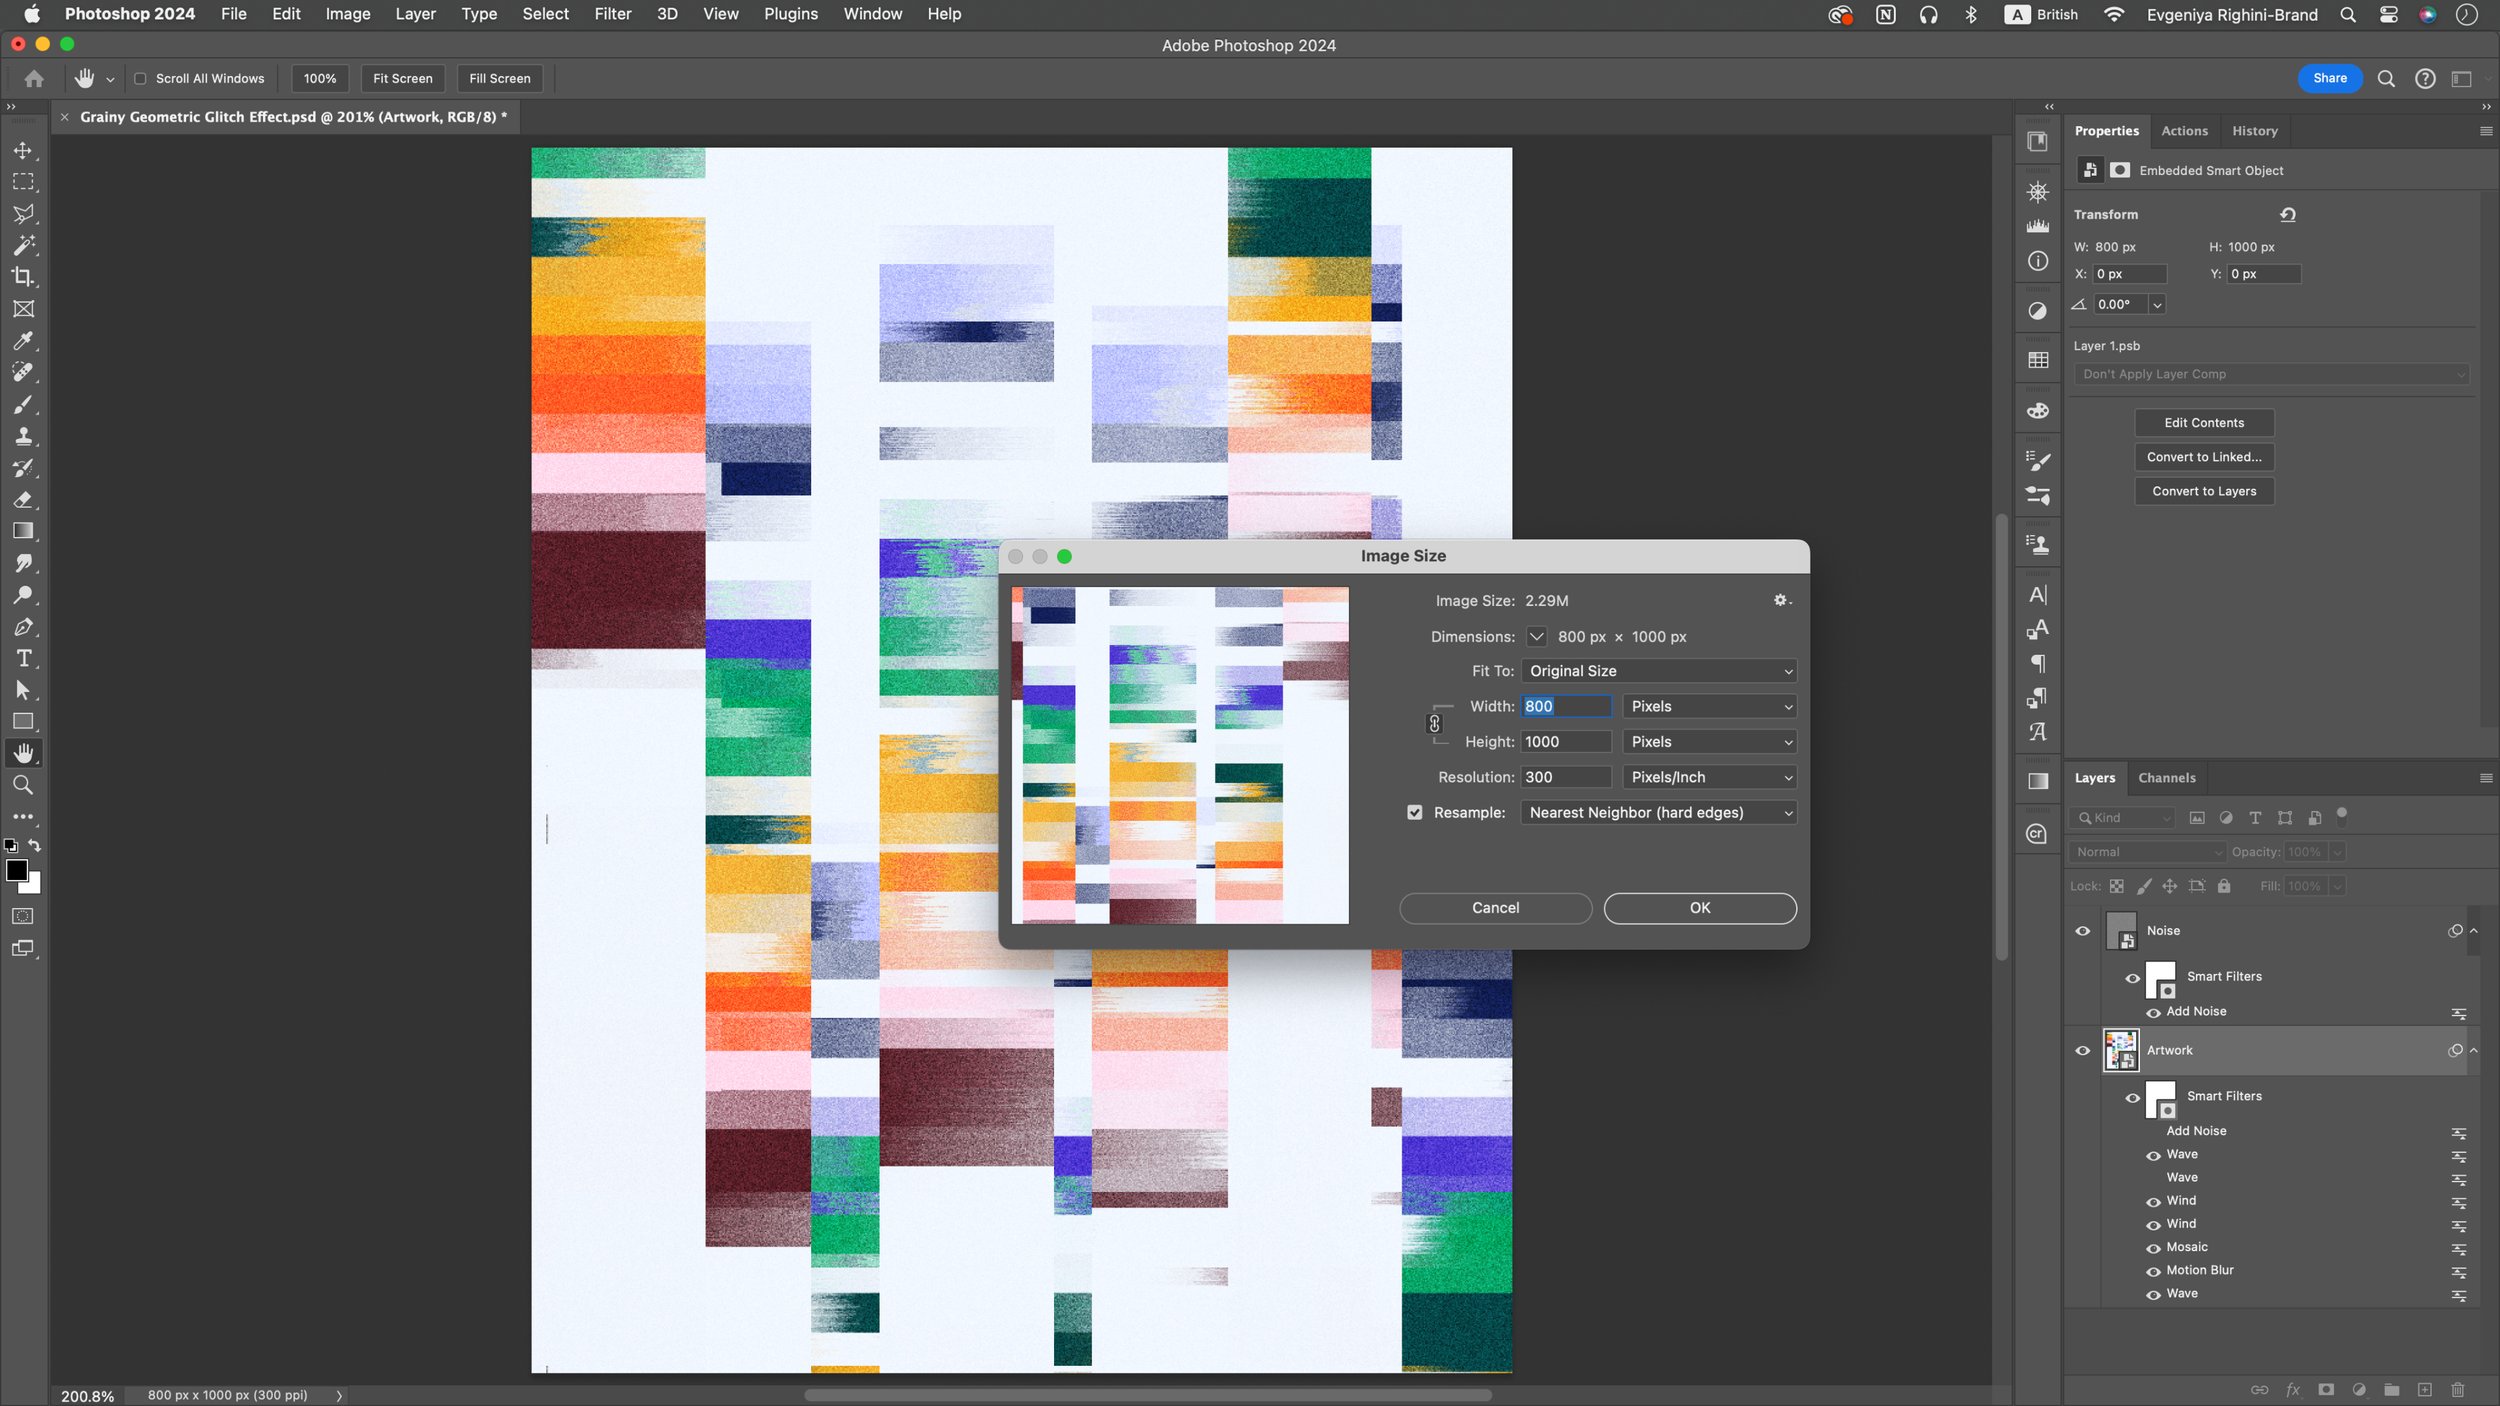
Open your flattened image file, hit Command+Option+I on Mac or Control+Alt+I in Windows to open the Image Size dialog. Change the dimensions of your image to whatever you need and, importantly, set the Resample Method to Nearest Neighbour (hard edges) which will preserve the pixelated look.
Apply changes, and here you have it with all the pixels and noise looking nice, large and still crisp!
And here is how you can make this sort of abstract colourful artworks! Have fun creating different colourful compositions within the Smart Object, or try applying these effects to any existing colourful work of yours — I bet it’ll be cool and you won’t even recognise what it was originally!
I'd love to see what you come up with, so be sure to tag us at @attitudecreative if you post your experiments on Instagram!

Create exciting and noisy artworks with a bit of a retro geometric aesthetic or experimental glitch vibe in just a few clicks!
If you want to be able to apply this kind of effects to any work in just a couple of clicks, don’t hesitate to grab our Grainy Glitch Abstract Art Generator Adobe Photoshop Actions kit!
In you want to use the same colours in your work as I’m using in my example, don’t hesitate to grab the free download of our selection of 2024 trending colour palettes — our palette is included alongside the other 19 from the leading decor and fashion companies!